Typical interactions in games include shooting, picking up objects, and opening doors. From an implementation point of view, these apparently different interactions are surprisingly similar: The user first aims and selects a target in the 3D scene, and then triggers an action on it. We call this process picking.
You can pick something by either pressing a key on the keyboard, or by clicking with the mouse. In either case, you identify the target by aiming a ray –a straight line– into the scene. This method to implement picking is called ray casting (which is not the same as ray tracing).
This tutorial relies on what you have learned in the 输入响应 tutorial. You find more related code samples under Mouse Picking and Collision and Intersection.
Sample Code
package jme3test.helloworld;
import com.jme3.app.SimpleApplication;
import com.jme3.collision.CollisionResult;
import com.jme3.collision.CollisionResults;
import com.jme3.font.BitmapText;
import com.jme3.input.KeyInput;
import com.jme3.input.MouseInput;
import com.jme3.input.controls.ActionListener;
import com.jme3.input.controls.KeyTrigger;
import com.jme3.input.controls.MouseButtonTrigger;
import com.jme3.light.DirectionalLight;
import com.jme3.material.Material;
import com.jme3.math.ColorRGBA;
import com.jme3.math.Ray;
import com.jme3.math.Vector3f;
import com.jme3.scene.Geometry;
import com.jme3.scene.Node;
import com.jme3.scene.Spatial;
import com.jme3.scene.shape.Box;
import com.jme3.scene.shape.Sphere;
/** Sample 8 - how to let the user pick (select) objects in the scene
* using the mouse or key presses. Can be used for shooting, opening doors, etc. */
public class HelloPicking extends SimpleApplication {
public static void main(String[] args) {
HelloPicking app = new HelloPicking();
app.start();
}
private Node shootables;
private Geometry mark;
@Override
public void simpleInitApp() {
initCrossHairs(); // a "+" in the middle of the screen to help aiming
initKeys(); // load custom key mappings
initMark(); // a red sphere to mark the hit
/** create four colored boxes and a floor to shoot at: */
shootables = new Node("Shootables");
rootNode.attachChild(shootables);
shootables.attachChild(makeCube("a Dragon", -2f, 0f, 1f));
shootables.attachChild(makeCube("a tin can", 1f, -2f, 0f));
shootables.attachChild(makeCube("the Sheriff", 0f, 1f, -2f));
shootables.attachChild(makeCube("the Deputy", 1f, 0f, -4f));
shootables.attachChild(makeFloor());
shootables.attachChild(makeCharacter());
}
/** Declaring the "Shoot" action and mapping to its triggers. */
private void initKeys() {
inputManager.addMapping("Shoot",
new KeyTrigger(KeyInput.KEY_SPACE), // trigger 1: spacebar
new MouseButtonTrigger(MouseInput.BUTTON_LEFT)); // trigger 2: left-button click
inputManager.addListener(actionListener, "Shoot");
}
/** Defining the "Shoot" action: Determine what was hit and how to respond. */
private ActionListener actionListener = new ActionListener() {
public void onAction(String name, boolean keyPressed, float tpf) {
if (name.equals("Shoot") && !keyPressed) {
// 1. Reset results list.
CollisionResults results = new CollisionResults();
// 2. Aim the ray from cam loc to cam direction.
Ray ray = new Ray(cam.getLocation(), cam.getDirection());
// 3. Collect intersections between Ray and Shootables in results list.
// DO NOT check collision with the root node, or else ALL collisions will hit the skybox! Always make a separate node for objects you want to collide with.
shootables.collideWith(ray, results);
// 4. Print the results
System.out.println("----- Collisions? " + results.size() + "-----");
for (int i = 0; i < results.size(); i++) {
// For each hit, we know distance, impact point, name of geometry.
float dist = results.getCollision(i).getDistance();
Vector3f pt = results.getCollision(i).getContactPoint();
String hit = results.getCollision(i).getGeometry().getName();
System.out.println("* Collision #" + i);
System.out.println(" You shot " + hit + " at " + pt + ", " + dist + " wu away.");
}
// 5. Use the results (we mark the hit object)
if (results.size() > 0) {
// The closest collision point is what was truly hit:
CollisionResult closest = results.getClosestCollision();
// Let's interact - we mark the hit with a red dot.
mark.setLocalTranslation(closest.getContactPoint());
rootNode.attachChild(mark);
} else {
// No hits? Then remove the red mark.
rootNode.detachChild(mark);
}
}
}
};
/** A cube object for target practice */
protected Geometry makeCube(String name, float x, float y, float z) {
Box box = new Box(1, 1, 1);
Geometry cube = new Geometry(name, box);
cube.setLocalTranslation(x, y, z);
Material mat1 = new Material(assetManager, "Common/MatDefs/Misc/Unshaded.j3md");
mat1.setColor("Color", ColorRGBA.randomColor());
cube.setMaterial(mat1);
return cube;
}
/** A floor to show that the "shot" can go through several objects. */
protected Geometry makeFloor() {
Box box = new Box(15, .2f, 15);
Geometry floor = new Geometry("the Floor", box);
floor.setLocalTranslation(0, -4, -5);
Material mat1 = new Material(assetManager, "Common/MatDefs/Misc/Unshaded.j3md");
mat1.setColor("Color", ColorRGBA.Gray);
floor.setMaterial(mat1);
return floor;
}
/** A red ball that marks the last spot that was "hit" by the "shot". */
protected void initMark() {
Sphere sphere = new Sphere(30, 30, 0.2f);
mark = new Geometry("BOOM!", sphere);
Material mark_mat = new Material(assetManager, "Common/MatDefs/Misc/Unshaded.j3md");
mark_mat.setColor("Color", ColorRGBA.Red);
mark.setMaterial(mark_mat);
}
/** A centred plus sign to help the player aim. */
protected void initCrossHairs() {
setDisplayStatView(false);
guiFont = assetManager.loadFont("Interface/Fonts/Default.fnt");
BitmapText ch = new BitmapText(guiFont, false);
ch.setSize(guiFont.getCharSet().getRenderedSize() * 2);
ch.setText("+"); // crosshairs
ch.setLocalTranslation( // center
settings.getWidth() / 2 - ch.getLineWidth()/2, settings.getHeight() / 2 + ch.getLineHeight()/2, 0);
guiNode.attachChild(ch);
}
protected Spatial makeCharacter() {
// load a character from jme3test-test-data
Spatial golem = assetManager.loadModel("Models/Oto/Oto.mesh.xml");
golem.scale(0.5f);
golem.setLocalTranslation(-1.0f, -1.5f, -0.6f);
// We must add a light to make the model visible
DirectionalLight sun = new DirectionalLight();
sun.setDirection(new Vector3f(-0.1f, -0.7f, -1.0f));
golem.addLight(sun);
return golem;
}
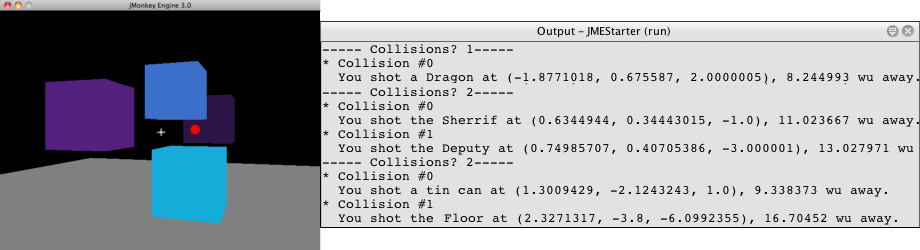
}You should see four colored cubes floating over a gray floor, and cross-hairs. Aim the cross-hairs and click, or press the spacebar to shoot. The hit spot is marked with a red dot.
Keep an eye on the application’s output stream, it will give you more details: The name of the mesh that was hit, the coordinates of the hit, and the distance.
Understanding the Helper Methods
The methods makeCube(), makeFloor(), initMark(), and initCrossHairs, are custom helper methods. We call them from simpleInitApp() to initialize the scenegraph with sample content.
makeCube()creates simple colored boxes for “target practice.makeFloor()creates a gray floor node for “target practice.initMark()creates a red sphere (“mark). We will use it later to mark the spot that was hit.Note that the mark is not attached and therefor not visible at the start!
initCrossHairs()creates simple cross-hairs by printing a “+ sign in the middle of the screen.Note that the cross-hairs are attached to the
guiNode, not to therootNode.
In this example, we attached all “shootable objects to one custom node, Shootables. This is an optimization so the engine only has to calculate intersections with objects we are actually interested in. The Shootables node is attached to the rootNode as usual.
Understanding Ray Casting for Hit Testing
Our goal is to determine which box the user “shot (picked). In general, we want to determine which mesh the user has selected by aiming the cross-hairs at it. Mathematically, we draw a line from the camera and see whether it intersects with objects in the 3D scene. This line is called a ray.
Here is our simple ray casting algorithm for picking objects:
Reset the results list.
Cast a ray from cam location into the cam direction.
Collect all intersections between the ray and
Shootablenodes in theresultslist.Use the results list to determine what was hit:
For each hit, JME reports its distance from the camera, impact point, and the name of the mesh.
Sort the results by distance.
Take the closest result, it is the mesh that was hit.
Implementing Hit Testing
Loading the scene
First initialize some shootable nodes and attach them to the scene. You will use the mark object later.
  Node shootables;
  Geometry mark;

  @Override
  public void simpleInitApp() {
    initCrossHairs();
    initKeys();
    initMark();

    shootables = new Node("Shootables");
    rootNode.attachChild(shootables);
    shootables.attachChild(makeCube("a Dragon",    -2f, 0f, 1f));
    shootables.attachChild(makeCube("a tin can",    1f,-2f, 0f));
    shootables.attachChild(makeCube("the Sheriff",  0f, 1f,-2f));
    shootables.attachChild(makeCube("the Deputy",   1f, 0f, -4));
    shootables.attachChild(makeFloor());
  }
Setting Up the Input Listener
Next you declare the shooting action. It can be triggered either by clicking, or by pressing the space bar. The initKeys() method is called from simpleInitApp() to set up these input mappings.
  /** Declaring the "Shoot" action and its triggers. */
  private void initKeys() {
    inputManager.addMapping("Shoot",      // Declare...
      new KeyTrigger(KeyInput.KEY_SPACE), // trigger 1: spacebar, or
      new MouseButtonTrigger(MouseInput.BUTTON_LEFT));         // trigger 2: left-button click
    inputManager.addListener(actionListener, "Shoot"); // ... and add.
  }
Picking Action Using Crosshairs
Next we implement the ActionListener that responds to the Shoot trigger with an action. The action follows the ray casting algorithm described above:
For every click or press of the spacebar, the
Shootaction is triggered.The action casts a ray forward and determines intersections with shootable objects (= ray casting).
For any target that has been hit, it prints name, distance, and coordinates of the hit.
Finally it attaches a red mark to the closest result, to highlight the spot that was actually hit.
When nothing was hit, the results list is empty, and the red mark is removed.
Note how it prints a lot of output to show you which hits were registered.
  /** Defining the "Shoot" action: Determine what was hit and how to respond. */
  private ActionListener actionListener = new ActionListener() {
    @Override
    public void onAction(String name, boolean keyPressed, float tpf) {
      if (name.equals("Shoot") && !keyPressed) {
        // 1. Reset results list.
        CollisionResults results = new CollisionResults();
        // 2. Aim the ray from cam loc to cam direction.
        Ray ray = new Ray(cam.getLocation(), cam.getDirection());
        // 3. Collect intersections between Ray and Shootables in results list.
        shootables.collideWith(ray, results);
        // 4. Print results.
        System.out.println("----- Collisions? " + results.size() + "-----");
        for (int i = 0; i < results.size(); i++) {
          // For each hit, we know distance, impact point, name of geometry.
          float dist = results.getCollision(i).getDistance();
          Vector3f pt = results.getCollision(i).getContactPoint();
          String hit = results.getCollision(i).getGeometry().getName();
          System.out.println("* Collision #" + i);
          System.out.println("  You shot " + hit + " at " + pt + ", " + dist + " wu away.");
        }
        // 5. Use the results (we mark the hit object)
        if (results.size() > 0){
          // The closest collision point is what was truly hit:
          CollisionResult closest = results.getClosestCollision();
          mark.setLocalTranslation(closest.getContactPoint());
          // Let's interact - we mark the hit with a red dot.
          rootNode.attachChild(mark);
        } else {
        // No hits? Then remove the red mark.
          rootNode.detachChild(mark);
        }
      }
    }
  };
Tip: Notice how you use the provided method results.getClosestCollision().getContactPoint() to determine the closest hit’s location. If your game includes a “weapon or “spell that can hit multiple targets, you could also loop over the list of results, and interact with each of them.
Picking Action Using Mouse Pointer
The above example assumes that the player is aiming crosshairs (attached to the center of the screen) at the target. But you can change the picking code to allow you to freely click at objects in the scene with a visible mouse pointer. In order to do this you have to convert the 2d screen coordinates of the click to 3D world coordinates to get the start point of the picking ray.
Reset result list.
Get 2D click coordinates.
Convert 2D screen coordinates to their 3D equivalent.
Aim the ray from the clicked 3D location forwards into the scene.
Collect intersections between ray and all nodes into a results list.
...
CollisionResults results = new CollisionResults();
Vector2f click2d = inputManager.getCursorPosition().clone();
Vector3f click3d = cam.getWorldCoordinates(
    click2d, 0f).clone();
Vector3f dir = cam.getWorldCoordinates(
    click2d, 1f).subtractLocal(click3d).normalizeLocal();
Ray ray = new Ray(click3d, dir);
shootables.collideWith(ray, results);
...
Use this together with inputManager.setCursorVisible(true) to make certain the cursor is visible.
Note that since you now use the mouse for picking, you can no longer use it to rotate the camera. If you want to have a visible mouse pointer for picking in your game, you have to redefine the camera rotation mappings.
Exercises
After a hit was registered, the closest object is identified as target, and marked with a red dot. Modify the code sample to solve these exercises:
Exercise 1: Magic Spell
Change the color of the closest clicked target!
Here are some tips:
Go to the line where the closest target is indentified, and add your changes after that.
To change an object’s color, you must first know its Geometry. Identify the node by identifying the target’s name.
Use
Geometry g = closest.getGeometry();
Create a new color material and set the node’s Material to this color.
Look inside the
makeCube()method for an example of how to set random colors.
Exercise 2: Shoot a Character
Shooting boxes isn’t very exciting – can you add code that loads and positions a model in the scene, and shoot at it?
Tip: You can use
Spatial golem = assetManager.loadModel(“Models/Oto/Oto.mesh.xml);from the engine’s jme3-test-data.jar.Tip: Models are shaded! You need some light!
Exercise 3: Pick up into Inventory
Change the code as follows to simulate the player picking up objects into the inventory: When you click once, the closest target is identified and detached from the scene. When you click a second time, the target is reattached at the location that you have clicked. Here are some tips:
Create an inventory node to store the detached nodes temporarily.
The inventory node is not attached to the rootNode.
You can make the inventory visible by attaching the inventory node to the guiNode (which attaches it to the HUD). Note the following caveats:
If your nodes use a lit Material (not “Unshaded.j3md), also add a light to the guiNode.
Size units are pixels in the HUD, therefor a 2-wu cube is displayed only 2 pixels wide in the HUD. – Scale it bigger!
Position the nodes: The bottom left corner of the HUD is (0f,0f), and the top right corner is at (settings.getWidth(),settings.getHeight()).
Link to user-proposed solutions: jm3:solutions |
Conclusion
You have learned how to use ray casting to solve the task of determining what object a user selected on the screen. You learned that this can be used for a variety of interactions, such as shooting, opening, picking up and dropping items, pressing a button or lever, etc.
Use your imagination from here:
In your game, the click can trigger any action on the identified Geometry: Detach it and put it into the inventory, attach something to it, trigger an animation or effect, open a door or crate, – etc.
In your game, you could replace the red mark with a particle emitter, add an explosion effect, play a sound, calculate the new score after each hit depending on what was hit – etc.
Now, wouldn’t it be nice if those targets and the floor were solid objects and you could walk around between them? Let’s continue to learn about 碰撞检测.
See also: